Monday, October 3, 2016

Fairy Flower Blossom Cake Tutorial

I've spent a lot of years living with little princesses and fairies.  I guess it comes with the territory of being a mama of three girls for the past 24 years!  
This is a tutorial of a cake that I made when my youngest little fairy princess was little and when her world revolved around Tinker Bell.  

Materials Needed:
1 9-inch Cake Layer (any flavor)
2 8-inch Cake Layers (any flavor)
1 batch of your Favorite Frosting
2 boxes of Rolled Fondant
Green paste Food Coloring
Violet paste Food Coloring
White Sparkling Sugar
Decorative Candle or Toy
Cake plate, stand or board
Frosting Spatulas/Spreaders
Heart-shaped Cookie Cutter


First start with one 9-inch cake layer.
Put it on your cake plate or board to decorate.


Frost the cake with your favorite frosting.
Not all people like the taste of fondant, so it is nice to have a tasty frosting for those who just peel it off.


Knead the store-bought rolled fondant in powdered sugar to make pliable.
Knead in green paste food coloring.


Roll the fondant out with a rolling pin to 1/8-inch thickness.


Lay fondant over cake layer; smooth with hands; trim excess.


Add one 8-inch cake layer; frost.
Add second 8-inch cake layer; frost.


Color the other box of the fondant violet.
Roll out; cover cake layers; smooth and trim.


Cut "petal" shapes from the violet fondant.
Adhere to the side of the cake with a little water.
Overlap the petals; curl tips back.


Cut the "leaves" out of green fondant with heart cookie cutter.
Adhere to the bottom of the blossom.


Make vines the way that you would make a play-doh snake.
Place them in a random wiggly pattern up the blossom.


Using a pastry brush, wet the fondant with water.
Place your candle or toy in the center of the blossom.
Sprinkle with Sparkling Sugar for whimsy.


This tutorial appeared on my family blog years ago and was featured on 
Tip Junkie! {my claim to fame :) }

Monday, September 26, 2016

Reindeer Cookies

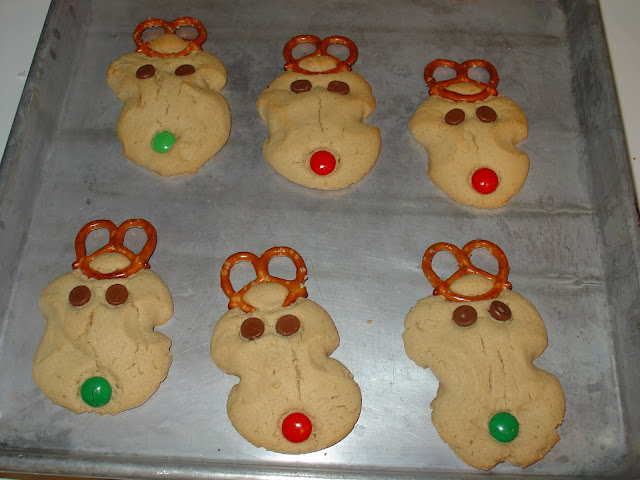
Here is one of our favorite family baking traditions. The reindeer cookie.
They are lots of fun to make, they look adorable--even the little ones can do it!


First you start with your favorite peanut butter cookie recipe.


Gather a few simple decorative toppings: tiny twist pretzels, chocolate chips and holiday M&Ms.


Roll dough into balls, press flat, then pinch slightly to create the 'reindeer' head shape.


Add a tiny twist pretzel for his antlers,


and chocolate chips (pointy side down)
for the eyes,


and finally an M&M for the nose!

Piece of cake! Well cookie, actually.

Bake as called for in your PB cookie recipe, but watch for the cracking of M&Ms-- it may be a minute or two less.

Ho Ho Ho! 


Thursday, September 22, 2016

How to Make Solar Oven

Whether it's for scouts or girls' camp, there is going to come a day when you have to figure out how to do some solar cooking.  

After looking all over Pinterest for solar cooking ideas and showing them to my 11-year-old son,  he took those ideas and ran with them.  Of course having an engineering mind and an eye for detail, he had a few changes that he wanted to make and this is what we came up with.  

Materials Needed:
Medium-sized Pizza Box
Hot Dogs
Aluminum Foil
Wooden Skewers (2)
Staples


Step 1:  Line the box with aluminum foil--using staples to keep it in place


Step 2:  Poke Skewers through one side of the box and into the hot dog(s) 

Step 3:  Poke skewers through the other side of the box


Step 4:  Find a sunny place, partially close the box, and allow the sun to do its thing!
 Optional Step:  
Give your solar oven a super cool name, like the Summer Solar Cookerator 5000!

Elapsed Time: 2 to 3 hours 

Note:  Keep hungry puppies away!  

Monday, August 29, 2016

Baklava Made Easy

I really believe in the power of getting to know one's roots, especially when becoming one with your culture leads to eating lots of yummy things. :)

 In my case, I have always been obsessed with the deliciousness that is Greek food.  When I was a kid and we went to Greek picnics, my dad bought me my weight in Greek pastries.  As an adult, Greek food brings memories of fun, love, and family. 

I have a great recipe for baklava--but I have simplified it over the years and I think that it is the best of both worlds--easy to make and a delicious Hellenic masterpiece!


Grind the walnuts in a food processor.  Combine nuts, cloves, and cinnamon in a bowl 


Brush bottom and sides of a 9 x 13-inch pan with melted butter
Layer pan with 10 sheets of phyllo, brushing each layer individually with a pastry brush
Found in the freezer section of most grocery stores
This particular batch was made for my daughter's wedding.  Shout out to Jennifer, Mother-of-the-Groom for her buttering skills :)
Sprinkle with a layer of nuts


Add another 10 layers of phyllo, buttering only the top layer

Sprinkle with another layer of nuts and repeat layering nuts and phyllo until all of the nut mixture is used

Top with 10 layers of phyllo, buttering each layer individually 

Tuck the excess phyllo down the sides of the pan
Brush top generously with melted butter
Using a sharp knife, cut pastry into diamond-shaped pieces, being careful not to cut through to the bottom of the pan


Cut vertical lines first (black); then cut diagonal lines (pink) to create diamond shapes

Bake at 325 for one hour or until puffy and golden brown


WHILE BAKLAVA IS BAKING...

Combine sugar, water, and lemon slices

Bring to a boil

Add cinnamon stick and simmer 15 minutes
Add honey and heat only until blended

Cool at room temperature


While pastry is still hot, pour cooled syrup over baklava  
Allow to set for one hour; cut pastry through to the bottom

  Leave in pan several hours or overnight before serving
Yep, I always taste test before anyone else can try it! :)

OPA!


Wednesday, April 27, 2016

Peanut Butter Kisses

No, this is not a recipe or a tutorial.  It's about my daily joy, the peanut butter kiss.

I have a love-hate relationship with journalling.  Actually, it's usually a hate-hate relationship because I set these horribly unrealistic goals for myself--like write every day--and then when I can't keep it up I quit. completely quit. for years.  Then, I start over.  I have several journals with writing only on the first dozen pages...


When I was shopping for a graduation gift for my daughter I came across this book.  It spoke to me from across the room.  I immediately had the thought to start a journal of happiness and joy.  No grumbling allowed.  Just the good stuff.  Things that make me smile.  I also told myself that I don't need to write every day and that has taken the pressure off.  big time.  

I have a few entries.  My favorite so far is about the peanut butter kiss that I get from my hubby every morning (he has peanut butter toast every morning; hence, the peanut butter kiss).   Had I not thought about it, I don't know that I would have realized the silly fact that my morning PB kiss makes me terribly happy. 
#peanutbutterbringspeopletogether

What makes you happy?

Wednesday, April 20, 2016

All that Glitters is Frozen

It's pretty great luck that my daughter's birthday is in March. Why great, you say? Well, all of the holiday movies tend to come out on DVD in March and what better birthday party than a special showing of the movie that all the little girls have been waiting for? Pretty great, right? We have featured Tangled, Cinderella, and in 2014 we had a very frosty premiere of Frozen. It's was very cool, I mean frozen. :)


Pompoms, squiggle streamers, and simple paper products in the colors of your choice really bring a party together.


Never underestimate the power of fruits, veggies, and popcorn.  Seriously, the kiddos eat it up!  Oh, and every great party has to have edible table decor--this time it was marshmallows (hello, Olaf!).  Skittles, M&M's, and gummy bears are also great for the nibblers that just can't wait for cake!


Candy-dipped popcorn and pretzels for the win!  Again, pick candy melts in your color scheme, drizzle them on a tray of pretzels or popcorn and voila! Looking for an alternative to mass-produced licensed party-ware? Grab a sheet of stickers in your theme and stick them on cups in your color scheme.  Easy peasy, and pretty cute. :) 

Candy-melt pretzels


Candy-melt popcorn
Behold the power of the cupcake.  Seriously, I have made some complicated (and pretty cool!) cakes in my time, but a homemade chocolate cupcake with anything glittery, pearly, or shiny is a crowd pleaser each and every time.  


I love to decorate with candy.  It's my favorite go-to party hack.  Sometimes I take colored or designed plates to the candy aisle and see what I can use.  Is there anything prettier than rock candy?  Oh, and basically it looks like blue ice, so double-win. 

Rock Candy
Every great party has to have a fun takeaway.  This year we used stickers on party favor boxes, filled with glazed popcorn and rock candy in our color scheme, added a fun nail polish, and the girls loved them! 


After all this chilly partying, it might be time for some hot cocoa!


Monday, April 18, 2016

Pink Chickpea Takes a Dip

Rovithis. Pronounced, Ro-VEE-this

It wasn't until I was in my teens that I found out what my maiden name meant. It's Greek for chickpea :) 

 Welcome to my new blog, Pink Chickpea.